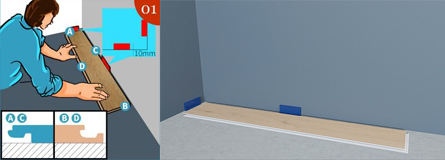

1. First, place the first piece of floor from the corner of the wall, with the lock female groove facing the outside, and place 5-10mm thick spacers on the short and long sides of the floor to maintain the required expansion gap with the wall.

2. Use the lock system to splice the short side, insert the short side into the short side female groove of the previous piece at an inclination angle of 15-20 degrees, and the lock will fit naturally after the floor is flat.

3. Continue to install the first row until the last piece. Measure and mark, then cut and break with a utility knife. Use the previous cut to start stitching the next line to stagger the texture.

4. When splicing the second row, first splicing the short side.

5. Then push the long side into the slot at an inclination angle of 15-20 degrees, and the lock will fit naturally after the floor is flat, keeping the alignment aligned. Continue laying the remaining floors.

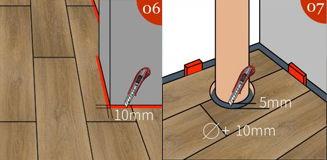
6.7 Leave a 10mm expansion joint around the obstacle.

8. Disassemble the lock. First remove the long side of the floor, lift the long side of the floor about 15-20 degrees, and gently pull out the entire row of floors. Then remove the short side of the floor, lift the short side of the floor about 15-20 degrees, and gently pull out the entire floor.
